

Easy Candy Cane Cookies: A Delicious Holiday Treat
Ah, the holiday season! It’s that magical time of year when kitchens become vibrant with the scent of baking, and the excitement of family traditions fills the air. Among the many treasured recipes that grace our tables, Candy Cane Cookies hold a special place in my heart. The very first time I attempted to make these delightful treats, I was a flustered teenager, determined to impress my family. Picture this: flour dusting the kitchen like snow and vibrant red and green smeared across the counter like a festive crime scene. Spoiler alert: the cookies turned out delicious, but the kitchen? Not so much!
Why on earth would I attempt such a complex cookie for my debut holiday baking endeavor? Well, my younger self was drawn to their vibrant colors and the promise of peppermint-y goodness. Fast forward to today, and I still get giddy at the thought of preparing these cookies, which have become a cherished family tradition. My kitchen may still witness its fair share of chaos, but with a few more tricks up my sleeve and a dash of humor, I embrace every mix-up as part of the experience.
This recipe is not just about throwing flour and sugar together; it’s about creating memories. The joy of mixing the dough, the anticipation of twisting candy cane shapes, and, of course, the delightful crunch of crushed candy canes on top—it’s pure comfort in each bite. So, settle in, grab your favorite mixing bowl, and let’s embrace the holiday spirit.
Why You’ll Love This Recipe
- Childhood Nostalgia: These cookies are like a blast from the past, bringing back fond memories of sipping hot cocoa while decorating them with family.
- Easy to Make: Seriously, if I can manage them as a busy teen, you can definitely whip these up!
- Festive Flair: They’re colorful, cute, and a perfect addition to your holiday cookie platter or gift boxes.
- Picky-Eater Approved: The sweet, minty flavor is a holiday hit, even with the pickiest eaters.
- Versatile Fun: Whether you’re hosting a party or making a cozy evening treat, these cookies fit every occasion!
- The Smell of Holidays: As they bake, your kitchen will fill with the warm aroma of peppermint—like a warm hug in culinary form.
What Makes This Recipe Special?
There’s something undeniably charming about the way these cookies combine buttery sweetness with that signature mint flavor. The interesting mix of vanilla and almond extracts also contributes to their unique flair, transforming what could be a standard cookie into something that tastes of holiday cheer. I love how the candy cane crunch adds that extra layer of texture, making each bite delightful.
Whenever I make these cookies, I’m reminded of my grandmother, who was the queen of holiday baking. She would crank up the Christmas tunes while telling stories of her youth as she rolled out dough. Her laughter would fill the room, and it’s memories like these that make this recipe even more special to me.
Ingredients
- 1 cup unsalted butter, softened: This forms the lovely base for the cookies, adding richness and flavor. Trust me, don’t skimp on this—margarine just won’t cut it here.
- 1 cup powdered sugar: For that sweetness and soft texture. Make sure it’s powdered, or you’ll end up with something totally unintended!
- 1 egg: This helps bind everything together. Go for large eggs for the best results.
- 1 teaspoon vanilla extract: Gives a warm, sweet flavor. I love using pure vanilla—but if you’re in a pinch, imitation will do.
- 1/2 teaspoon almond extract: This might seem optional, but believe me, it adds a delightful hint that really elevates these cookies.
- 2 1/2 cups all-purpose flour: The backbone of our cookie! Don’t substitute this one; it’s essential for the right texture.
- 1/2 teaspoon salt: A little saltiness balances the sweetness and brings out all the flavors.
- 1/2 teaspoon peppermint extract: The star of the show! Go for a high-quality peppermint extract for the best flavor.
- Red and green food coloring: For that festive touch—feel free to go wild!
- Crushed candy canes for decoration: Gives that classic Candy Cane effect. I’ll admit, sometimes I crush too many and find excuses to sprinkle them on everything!
Make sure you’ve got everything prepped! I once forgot to buy eggs and had to scramble (pun intended) to make impromptu crisps instead of cookies. Oops!
How to Make It Step-by-Step
Alright, here we go! Don’t worry if your first batch doesn’t turn out perfect—baking is as much about the journey as it is about the destination!
-
Preheat the oven to 375°F (190°C): First things first! Preheating helps ensure even baking. While your oven warms up, take a moment to bask in the pre-holiday warmth already wafting through your kitchen.
-
Cream together the butter and powdered sugar until light and fluffy: This is where magic happens! Using an electric mixer (or some serious elbow grease if you’re feeling adventurous), mix until it’s pale and fluffy like a cloud. You’ll know it’s ready when it turns light in color. You might want to stop every now and then to breathe in that buttery goodness.
-
Add the egg, vanilla, and almond extract: Whip these in, savoring the aroma. I usually try to make sure the egg is at room temperature – it just cooperates better that way. You’ll want a smooth mix here.
-
In another bowl, combine the flour and salt: Mixing the flour with salt beforehand helps ensure even distribution. Nothing worse than a salty cookie, right?!
-
Gradually add the dry mixture to the wet mixture: Slowly incorporate the dry ingredients into the wet mixture. Start with a spoon, then go in with your hands if you want! I’ve had my moments where I totally miscalculated the flour, ending up with a sticky mess—but oh well, a good dough is supposed to be messy!
-
Divide the dough in half: This is where the fun begins! One half remains plain, and to the other half, add the peppermint extract and a few drops of red food coloring. Play around with it until you get a pink you like—not too dark!
-
Roll the dough into strips: Channel your inner artisan baker! Take small pieces of each dough and roll them into strips. Honestly, my first rolls looked like short squiggly worms. And that absolutely worked! The look doesn’t matter much as they’ll twist together anyway.
-
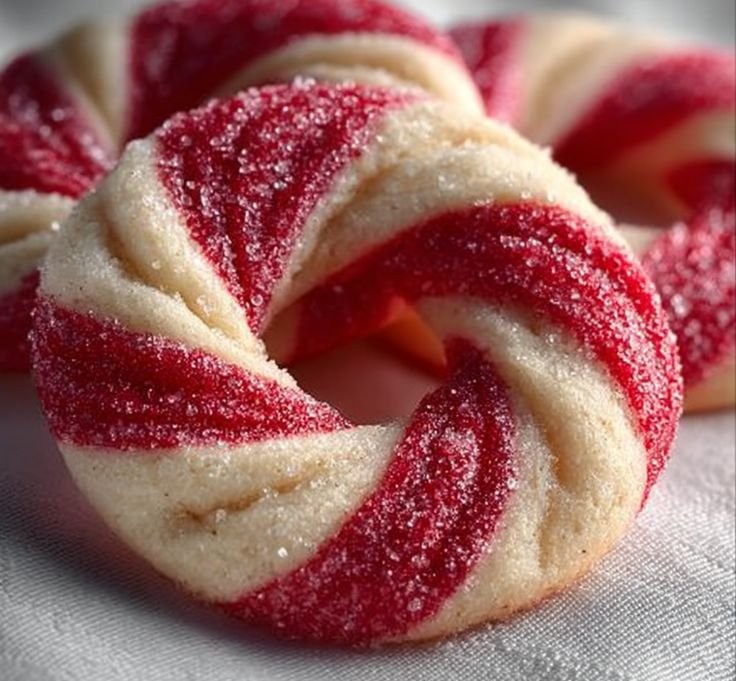
Twist the red and white dough together: Form a candy cane shape by twisting the two strips together. It’s okay if they look a bit asymmetrical; this just adds to their charm!
-
Place them on a greased baking sheet: Line your sheet with parchment paper for easy cleanup.
-
Bake for 9-10 minutes: Keep an eye on them! I once got distracted while catching up on a show and nearly turned my cookies to hockey pucks. Let’s just say, I learned to set a timer!
-
Once cooled, sprinkle crushed candy canes on top: Ooh, the magic touch! As they cool, you can throw these delightful bits of candy over the top. These little crunches not only make them pretty but also add bursts of flavor.
Tips for Best Results
- Chill the dough: If you find the dough too soft to handle, chilling it for 30 minutes can make rolling easier—it’s a lifesaver!
- Experiment with colors: Don’t be shy! Let your creativity flow—try out blues, yellows, or even pastel shades for a fun twist.
- Keep an eye on baking time: Ovens can be finicky at times. They might bake faster or slower than expected. If they look slightly golden at the edges, they’re likely done!
- Sprinkle immediately after baking: The warm cookies help the crushed candy canes stick better, making for that perfect topping.
Ingredient Substitutions & Variations
If you’re feeling adventurous (or if you ran out of something), there are always tweaks to consider:
- Gluten-Free Option: Swap the all-purpose flour for a gluten-free blend. Just look for one that measures cup-for-cup!
- Nut-Free: If you need to avoid nut flavors, stick with vanilla extract only.
- Cocoa Candy Canes: Mix some unsweetened cocoa powder into half the dough and make them chocolatey.
- Different Extracts: If peppermint isn’t your thing, orange or lemon extracts can create a refreshing twist as well.
- Non-Dairy: Use coconut cream or dairy-free butter to get that rich flavor without dairy.
Directions
Ready to tackle those candy cane beauties? Follow these straightforward steps, and you’ll have a batch of tasty cookies in no time.
- Preheat your oven to 375°F (190°C).
- Cream together the softened butter and powdered sugar until fluffy and light. Incorporate the egg and extracts.
- Combine flour and salt, and gradually mix them in until well combined.
- Split the dough; color half red with peppermint extract; leave the other half plain.
- Roll strips of both doughs and twist them to form candy cane shapes.
- Place the cookies on a greased or lined baking sheet and bake for 9-10 minutes.
- After cooling, sprinkle crushed candy canes on top for a festive finish.
Pairing Ideas (Drinks, Sides, etc.)
Let’s not forget to pair these cookies with something delightful! Here are some ideas:
- Hot Cocoa: A classic pairing. Imagine cozying up with a warm drink while nibbling on these cookies. It’s a holiday dream!
- Coffee or Tea: They make a great afternoon treat with a nice, warm cup of something comforting.
- Milk: Because, seriously, what’s a cookie without milk? It’s a timeless combo that never gets old.
- Holiday Cheeseboard: Pitch it alongside your cheeseboard for a sweet touch—trust me, your guests will thank you.
How to Store and Reheat Leftovers
After that cookie craving is satisfied, you might find a few leftover. Honestly, I’ve never seen a full batch make it past a day, but just in case! Store them in an airtight container at room temperature for up to a week. They’re perfect for snacking throughout the holiday season.
If you want to enjoy them warm again, just pop them in the microwave for a few seconds, and they’ll be as good as fresh.
Make-Ahead and Freezer Tips
Feeling ahead of the game? You can also make the dough ahead of time and freeze it. Roll the cookie shapes, place them in a single layer on a baking sheet, then freeze until solid. Once frozen, transfer them into a bag. When you need a sweet treat, bake them straight from the freezer—no thawing needed!
Common Mistakes to Avoid
- Too much flour: Avoid measuring directly over the mixing bowl. Wait until it’s all mixed in before you tweak the quantity. Each scoop might pack differently!
- Baking too long: Keep checking! The cookies should look set, but aren’t hard.
- Skipping the cooling step: Resist the urge to decorate while they’re warm! Let them cool so the toppings stick best.
Frequently Asked Questions (FAQ)
- Can I chill the dough? Absolutely! Chilling can help with handling and rolling.
- How do I make them more colorful? Use gel food coloring instead of liquid for vibrant hues.
- Can I mix flavors? Sure can! Experiment with spice mixes or lemon zest for a unique flavor twist.
Cooking Tools You’ll Need
- Mixing bowls
- Electric mixer or whisk
- Measuring cups and spoons
- Rolling pin or your hands!
- Baking sheet
- Parchment paper (if you want to make your life easier!)
Final Thoughts
Baking Candy Cane Cookies isn’t just about the end product; it’s about the memories created, the laughter shared, and the warmth of the season. So while my kitchen may still look like a festive tornado after a baking session, every sprinkle of flour and candy cane is a step toward creating joy.
I hope this recipe finds a home in your holiday traditions, just like it has in mine. If you decide to give it a go, I would love to hear about your experience!
If you enjoyed this recipe, don’t forget to save it on Pinterest or share it with a friend! 🍪✨

Candy Cane Cookies
Ingredients
Main Ingredients
- 1 cup unsalted butter, softened Forms the base for the cookies, adding richness and flavor.
- 1 cup powdered sugar Provides sweetness and soft texture.
- 1 large egg Helps bind everything together.
- 1 teaspoon vanilla extract Adds a warm, sweet flavor.
- 1/2 teaspoon almond extract Enhances the flavor.
- 2 1/2 cups all-purpose flour Essential for the right cookie texture.
- 1/2 teaspoon salt Balances sweetness.
- 1/2 teaspoon peppermint extract Key flavor component.
- as needed drops red and green food coloring For festive decoration.
- as needed cups crushed candy canes For topping and decoration.
Instructions
Preparation
- Preheat your oven to 375°F (190°C).
- Cream together the softened butter and powdered sugar until fluffy and light.
- Incorporate the egg, vanilla extract, and almond extract into the creamed mixture.
- In a separate bowl, combine the flour and salt.
- Gradually mix the dry ingredients into the wet mixture until well combined.
- Divide the dough in half; keep one half plain and color the other half with peppermint extract and red food coloring.
Shaping the Cookies
- Roll strips of both dough types and twist them together to form candy cane shapes.
- Place the cookies on a greased or lined baking sheet.
Baking
- Bake for 9-10 minutes until slightly golden at the edges.
- Once cooled, sprinkle crushed candy canes on top for a festive finish.


